Category: Unity

  • Part 7: Ownership & Animation – The Definitive Guide

    Part 7: Ownership & Animation – The Definitive Guide

    Animations are tricky in a Client-Side Prediction (CSP) model. Do you play them instantly and risk them being wrong? Or do you wait for the server and risk them feeling laggy? The answer depends on ownership and the gameplay context.

    This guide explains the advanced logic used in our project to handle every animation case correctly.


    The 4 Horsemen of CSP Context: isOwnerisServerisVerifiedisVerifiedAndReplaying

    To make smart decisions about animation, you first need to understand the context you’re in. PurrNet provides several boolean properties that tell you exactly what’s happening.

    1. isOwner:
      • What it means: “Is this game instance the one that directly controls this object?”
      • Client: true for your own player character. false for everyone else’s character and all AI.
      • Server: true for all AI (since the server controls them). false for all player-controlled characters (even though it has authority, it doesn’t “own” their inputs).
    2. isServer:
      • What it means: “Is this code running on the server/host?”
      • Client: Always false.
      • Server/Host: Always true.
    3. isVerified:
      • What it means: “Is the simulation tick we are currently processing based on data that has been confirmed by the server?”
      • Client: Only true during a rollback and re-simulation (a.k.a. “replaying”). It’s false during normal, live prediction.
      • Server/Host: Always true during its normal simulation, because the server is the source of truth.
    4. isVerifiedAndReplaying:
      • What it means: This is a convenient property that essentially combines isVerified && isReplaying. It’s the most reliable way for a client to know: “Am I currently in a re-simulation process based on a server-corrected state?”
      • Client: true only during a replay. This is your go-to flag for triggering “correctness-first” logic.
      • Server/Host: false during normal simulation.

    The Great Divide: UpdateView() vs. Simulate()

    As mentioned in the previous guides, our project uses an architectural split to manage animations based on our needs.

    ShouldUpdateAnimationsInView() → For Owned Objects

    • When it’s true: When the object is yours (isOwner is true).
    • Why: This is for maximum responsiveness. When you press a button, you want to see your character animate instantly. Since you are the source of the inputs, your predictions are highly likely to be correct. We run this in UpdateView() which uses the smooth, interpolated state, making your character’s movement feel fluid. The system architecture guarantees that UpdateView() is never called during a rollback, so we only need to check for ownership.

    ShouldUpdateAnimationsInSimulate() → For Non-Owned Objects

    • When it’s true: When the object is not yours AND the server is running the code OR you are a client replaying a verified tick.
    • Why: This is for maximum correctness. You have no idea what another player or an AI is going to do. Their state is constantly being predicted (extrapolated) and corrected. If you animated them based on your potentially wrong prediction, you’d see them stutter and pop constantly. By waiting for a isVerifiedAndReplaying tick, you guarantee the animation you are about to play corresponds to what the server actually said happened.

    The Trade-Off: Responsiveness vs. Correctness

    You can’t always have both. Sometimes you must choose.

    The Problem with Animating Non-Owned Objects in UpdateView()

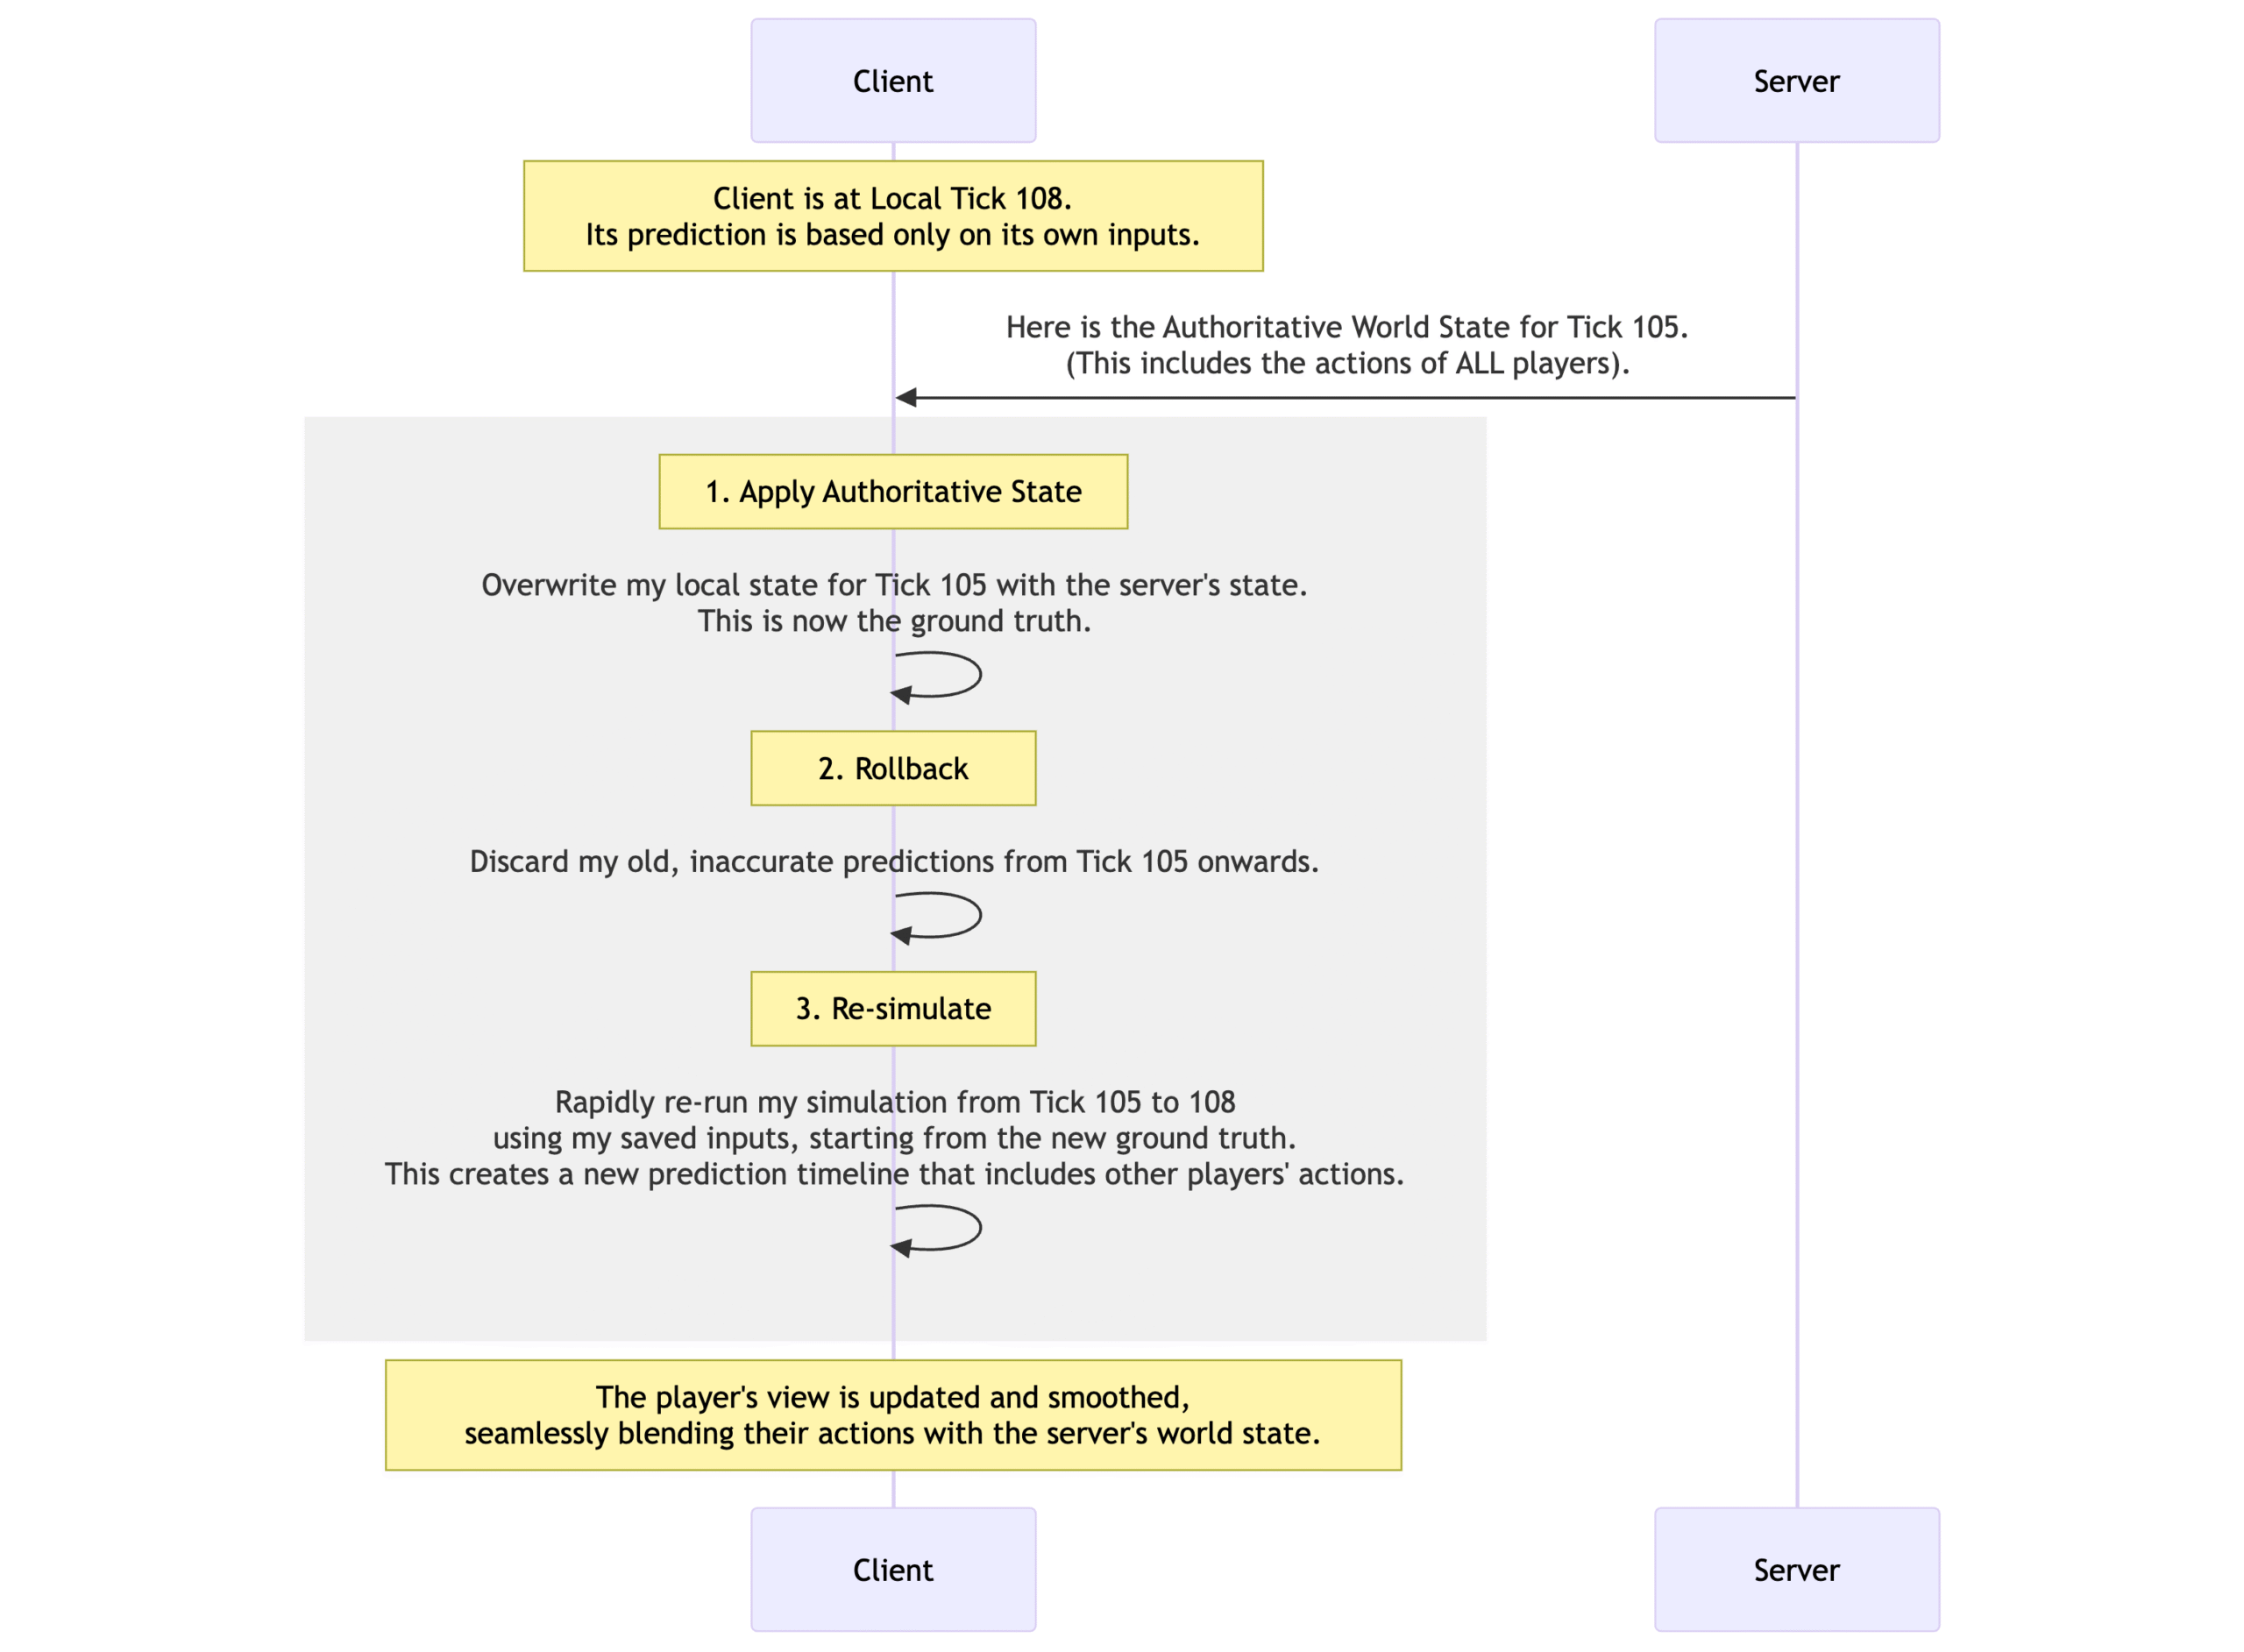
    UpdateView() runs every visual frame and uses an interpolated state. This state is a smooth “guess” between two past authoritative states sent by the server. If a client’s prediction about that object was wrong, the interpolated state is also a lie.

    Scenario:

    1. Your client predicts an enemy AI will move left.
    2. The UpdateView() interpolates this predicted movement and plays the “Run Left” animation.
    3. The server’s state arrives and says, “Actually, the AI moved right.”
    4. Reconciliation happens. The AI model snaps to its correct position.
    5. Result: The player sees the AI animate left for a few frames before instantly appearing on the right and running right. It looks like a bug.

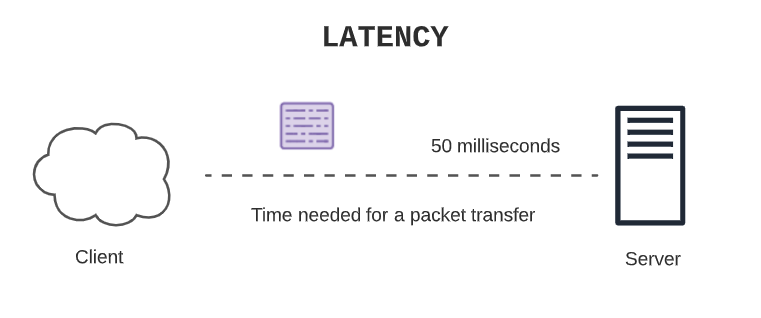
    By animating non-owned objects only on verified ticks inside Simulate(), we avoid this visual lie. We accept a tiny delay (~50-100ms, the player’s latency) in exchange for the animation always matching the character’s true actions.

    When to Break the Rules: The Case for Predicted Effects

    Sometimes, instant feedback is more important than 100% accuracy. This is a deliberate design choice.

    • Hit/Damaged Animations: When you hit an enemy, you want to see them react now. In our project, the PlayerDamaged state is allowed to transition and play its animation immediately, even on a prediction. If the server later says the hit didn’t happen, the animation might be cut short by the rollback, but the initial responsive feedback is worth that small risk. It makes combat feel crunchy and impactful.
    • Death Animations: This is the opposite. A death animation is a final, critical state change. It would be incredibly weird and frustrating for a player to see an enemy start dying, only for it to snap back to life because the prediction was wrong (e.g., the server determined your shot missed).
      • Therefore, in our project, the PlayerDead state change and its animation MUST wait for server verification. We sacrifice a little responsiveness for absolute correctness on critical gameplay events.

    📋 Animation Checklist

    • Is this my character? (isOwner)

    [✅] Animate in UpdateView() for maximum responsiveness.

    • Is this another player’s character or an AI? (!isOwner)

    [✅] Animate in Simulate() but guard it with isVerifiedAndReplaying (or isServer) for correctness.

    • Is this a low-impact, feedback-oriented animation (like a hit flash)?

    [✅] Consider playing it predictively in UpdateView for all players to make the game feel more impactful. Accept the risk of it being rolled back.

    • Is this a critical, gameplay-defining animation (like death, a stun, or a powerful ultimate ability)?

    [✅] Never play this predictively for non-owned objects. Always wait for the server’s authority.

  • Part 6: Performance — The Basics to Get You Going

    Part 6: Performance — The Basics to Get You Going

    Now that you understand determinism and state, let’s focus on two areas that will make or break your game’s quality: performance and architecture. A fast, well-structured codebase is easier to debug and more enjoyable to play.

    Performance Killers in Simulate()

    The Simulate() method is the heart of your game. It runs every single tick (30 times per second in our case) for every predicted object. If it’s slow, your entire game will suffer. Here are the two most common performance killers.

    1. Memory Allocation & The Garbage Collector (GC)

    What is Garbage Collection? Think of memory as a big workspace. When you create a new object (like with new List<T>()), you’re putting a new item on a workbench. The Garbage Collector is a janitor that periodically has to stop everything, find all the items that are no longer being used, and sweep them away to free up space.

    This “stop and sweep” process causes a stutter or hitch in your game. In a simulation that needs to be smooth, these hitches are unacceptable. The key to performance is to create as little “garbage” as possible.

    ❌ The Wrong Way: new List<T>()

    Using new List<T>() inside a simulation loop is one of the worst offenders. You’re creating a new list, using it for a fraction of a second, and then throwing it away, forcing the GC to clean it up later.

    // ❌ BAD: Creates garbage every time it's called.
    public void FindNearbyEnemies()
    {
        var nearby = new List<AIController>(); // Creates a new list (garbage!)
        // ... finds enemies and adds to list
    } // The list is now garbage, waiting to be collected.
    
    C#

    ✅ The Right Way: Pooling with DisposableList<T>

    PurrNet provides a powerful solution: Object Pooling. Instead of creating and destroying lists, we “rent” them from a pre-made pool and “return” them when we’re done. DisposableList<T> is your best friend for this.

    It’s designed to be used with a using block, which automatically returns the list to the pool when you’re done. No garbage is created!

    ✅ A Perfect Example from Our Project:

    PlayerManager.cs needs a list to store player IDs. Instead of creating a new List, it correctly uses DisposableList<PredictedComponentID>.Create(). This list is part of the state and is managed by PurrNet’s pooling system.

    // Player.PlayerManager.cs
    
    protected override PlayerManagerState GetInitialState()
    {
        return new PlayerManagerState
        {
            // ✅ PERFECT: Rents a list from the pool instead of creating new garbage.
            activePlayerIds = DisposableList<PredictedComponentID>.Create(4) 
        };
    }
    
    // And it's properly disposed of when the state is no longer needed.
    public void Dispose()
    {
        activePlayerIds.Dispose();
    }
    
    C#

    2. Expensive Function Calls: GetComponent()

    Well this is more a Unity specific related stuff but as you know, calling expensive methods such as GetComponent<T>() is slow. It has to search through every component on a GameObject to find the one you’re looking for. Doing this every tick for dozens of objects will quickly slow down your game.

    ❌ The Wrong Way: GetComponent in the loop

    // ❌ BAD: This searches for the Rigidbody 30 times per second!
    protected override void Simulate(ref MyState state, float delta)
    {
        var rigidbody = GetComponent<Rigidbody>(); 
        rigidbody.velocity = newVelocity;
    }
    
    C#

    ✅ The Right Way: Caching Components

    The solution is simple: find the component once in Awake() and store a reference to it (cache it). Then, in your simulation, you can access the cached reference instantly.

    ✅ A Good Example from Our Project:

    AIMovementModule.cs needs to know the size of its collider. Instead of calling GetComponent<BoxCollider2D>() repeatedly, it gets the collider once in Awake() and stores its size in _cachedColliderSize.

    // AI._Module.Movement.AIMovementModule.cs
    
    public class AIMovementModule : PredictedIdentity<AIMovementStateData>
    {
        private Vector2 _cachedColliderSize; // The cached value
    
        private void Awake()
        {
            // ✅ Get the component ONCE at the start.
            var collider = GetComponent<BoxCollider2D>();
            if (collider == null) throw new System.Exception("...");
    
            // ✅ Store the value for later, fast access.
            _cachedColliderSize = collider.size;
        }
    }
    
    C#

    🎓 Conclusion

    By internalizing these two principles, you will ensure your game runs smoothly even with many objects in the world.

    In the future, we’ll explore a more in-depth example of good game architecture alongside more advanced performance optimizations — such as determining acceptable bandwidth limits (KB/s) for different types of games, disabling the synchronization of objects your player can’t see, and replacing heavy full-object physics synchronization with lighter alternatives (e.g., running a raycast on the server and only syncing the result if it hits). These techniques will help you push your game’s performance even further while keeping network usage efficient.


    Next Up: Part 7 – Ownership & Animation

    Now that your code is fast, let’s tackle one of the most complex architectural challenges: how and when to play animations in a networked environment.

  • Part 5: Reconciliation & State Management

    Part 5: Reconciliation & State Management

    In the previous guides, we established that reconciliation is the core process for synchronizing the client with the server’s authoritative state. Now, let’s dive deeper into the mechanics of how this “rewind and replay” magic actually works and what it demands from our code.

    The Reconciliation Process: A Deeper Look

    While the concept is simple (server corrects client), the process is a precise, high-speed sequence of events. Let’s walk through the client’s internal monologue during a typical reconciliation:

    1. “Truth has arrived”: A packet comes in from the server. It contains state data for tick 105.
    2. “Let me check my notes”: I look at my own predicted history for tick 105. The server’s update says my position is (10, 5), but my prediction was (12, 5). My prediction was wrong! This could be due to my own latency or, more commonly, because another player’s action (which I just learned about) affected me.
    3. “Time to rewind (Rollback)”: I perform a Rollback. I throw away my incorrect predictions from tick 105 onwards and reset my current state to exactly what the server told me for tick 105.
    4. “Fast-forward to the present (Re-Simulate)”: I now Re-Simulate, instantly running my Simulate() logic for every tick from 105 up to my current local tick (e.g., 108), using my saved inputs. This generates a new, corrected prediction timeline.

    Because this all happens in a single frame, the player just sees their character smoothly correct its course.

    This entire process relies on one crucial thing: a well-designed State Struct.

    State Management: What to Reconcile?

    The state struct (the one that implements IPredictedData) is the “save file” for a given tick. It must contain the absolute minimum data required to perfectly re-simulate the future.

    Putting too much data in the state wastes network bandwidth and CPU. Putting too little data in makes deterministic replay impossible.

    ✅ DO: Include in the State

    Think of these as the “seeds” of your gameplay logic.

    • Critical Timers & Counters: Anything that controls when an action happens
    public struct MyAIState : IPredictedData<MyAIState>
    {
      public float timeTillNextPatrolAction; // Determines when the AI changes its patrol behavior.
      public float attackTimer;              // Controls cooldowns or charge-up times for attacks.
    }
    C#

    • Logical State: Booleans or enums that fundamentally change an object’s behavior.
    public struct MyAIState : IPredictedData<MyAIState>
    {
      public uint health; // My AI's health
      public PatrolPhase patrolPhase; // Is the AI moving or pausing? Essential for replay.
    }
    C#

    ❌ DON’T: Exclude from the State

    • Static Configuration Data: Values that don’t change during gameplay. These should be in a ScriptableObject.
    // ❌ WRONG: This data is static. Don't put it in the state.
    public struct BadAIState : IPredictedData<BadAIState>
    {
        public float maxSpeed;      // This is in AIDataSO, it never changes, no need to reconcile that.
        public float attackDamage;  // This is in AIDataSO, it never changes.
    }
    C#

    • Derived Data: Values that can be calculated from other state variables. This is important to keep good performance.
    // ❌ WRONG: Speed and isMoving can be derived from velocity.
    public struct BadPlayerState : IPredictedData<BadPlayerState>
    {
        public Vector2 velocity; // ✅ GOOD: The source of truth. (You don't need to add the velocity in the state if you're using a PredictedRigidbody, PurrNet handles that for you)
        public float speed;      // ❌ BAD: Calculate this with velocity.magnitude when needed.
        public bool isMoving;    // ❌ BAD: Calculate this with velocity.magnitude > 0.1f when needed.
    }
    C#

    • References to Unity Components: You cannot serialize a Transform or Rigidbody2D. The state should be pure data.
    // ❌ WRONG: These are Unity objects, not data.
    public struct BadState : IPredictedData<BadState>
    {
        public Transform target;        // Cannot be reconciled.
        public Rigidbody2D rb;          // Cannot be reconciled.
    }
    C#

    Ask yourself this question for every variable:

    “If I delete this variable from the state, is it IMPOSSIBLE for me to perfectly re-simulate the entity’s behavior from a rollback?”

    If the answer is YES, it belongs in the state. If NO, it probably doesn’t.


    🔧 ref var state = ref currentState – Why It’s CRITICAL

    In C#, structs are value types. When you assign them, you create a full copy.

    • ❌ Without ref: var state = currentState; makes a copy. Any changes to state are lost unless you copy it back with currentState = state;. This is slow and bug-prone.
    • ✅ With ref: ref var state = ref currentState; creates a direct reference. Changes to state instantly affect currentState with zero copying. It’s faster, safer, and cleaner.

    Use ref for writing to the state. Use direct access (currentState.myVar) for reading.

    Real Performance Difference Example

    // Complex state structure
    public struct ComplexState : IPredictedData<ComplexState>
    {
        public Vector3 position; // ❌ Remember, no need to add that to the state if you're using PurrNet's PredictedRigidbody
        public Vector3 velocity; // ❌ No need
        public Quaternion rotation; // ❌ No need
        public float health;
        public float energy;
        public bool[] abilities; // 50 booleans
        public PredictedRandom random;
        // Total: ~300 bytes
    }
    
    // ❌ SLOW - Copies 300 bytes every change
    public void UpdateHealth(float damage)
    {
        var state = currentState; // Copies 300 bytes
        state.health -= damage;
        currentState = state;     // Re-copies 300 bytes
    }
    
    // ✅ FAST - Modifies 4 bytes (float) directly
    public void UpdateHealth(float damage)
    {
        ref var state = ref currentState; // No copy
        state.health -= damage;
    }
    C#


    📋 “Reconciliable State” Checklist

    ✅ INCLUDE in state:

    •  Position, rotation, velocity (PurrNet already handles that if you’re using a PredictedRigidbody
    •  Timers and gameplay counters
    •  Logical states (phases, modes)
    •  Deterministic RNG (PredictedRandom)
    •  IDs of targets or key references

    ❌ EXCLUDE from state:

    •  Computable values (e.g. speed from velocity)
    •  Constants and config (e.g. maxSpeed)
    •  Unity object references (Transform, Rigidbody)
    •  Caches or optimizations
    •  Debug or UI data

    🎯 To sum up, the Golden Rule for Deciding

    Simple Test: “The Time Travel Test”

    Imagine explaining what happened in the game at tick 100, and someone needs to reproduce ticks 101, 102, 103…

    Ask yourself:

    1. “Without this data, will the simulation be different?”YES = Include it
    2. “Can this data be recalculated from other data?”YES = Exclude it
    3. “Does this data change during the simulation?”NO = Exclude it
  • Part 4: The Core Principles of Determinism

    Part 4: The Core Principles of Determinism

    For Client-Side Prediction to work effectively, we have one primary goal:

    Our gameplay code must strive to be 100% deterministic.

    What does this mean? It means that for the same set of inputs, your code should produce the exact same outcome, every time, on any machine. If your client’s code calculates that Input A results in State B, the server’s code must do the same.

    Now, you might be thinking,

    But isn’t perfect determinism impossible in Unity because of things like floating-point math or physics?

    And you’d be absolutely right. Tiny inaccuracies can and do occur between the client and server simulations.

    This is where the magic of a good prediction system like PurrNet comes in. It’s designed to handle these minor discrepancies. When the server sends a corrected state, the client doesn’t just “snap” to the new position. It smoothly interpolates the correction over a fraction of a second, making tiny errors completely invisible to the player.

    So, while the system can handle small mistakes, our job as developers is to not make its life harder. The “unbreakable rule” is really about our own code: we must avoid sources of major non-determinism. If our code is deterministic, the reconciliation system only has to correct tiny floating-point errors. If our code is not deterministic (e.g., using UnityEngine.Random), the errors will be large and frequent, leading to a jumpy, jittery experience for the player. This is a desync.

    Let’s explore the common “determinism killers”—the major sources of non-determinism that we, as developers, must control.


    1. The Randomness Problem

    Computers can’t generate truly random numbers; they use complex algorithms seeded by a starting value. The problem is where that seed comes from.

    ❌ The Wrong Way: UnityEngine.Random

    UnityEngine.Random (and System.Random) is often seeded by the system clock or other non-predictable values. This means Random.Range(0, 10) will produce a different sequence of numbers on your machine versus the server’s.

    // ❌ NON-DETERMINISTIC: This will cause desyncs!
    void Simulate(ref PlayerState state, float delta)
    {
        // Every client and the server will get a DIFFERENT number.
        if (UnityEngine.Random.Range(0f, 1f) < 0.1f) 
            state.health += 10;
    }
    
    C#

    ✅ The Right Way: PredictedRandom

    The core principle of deterministic randomness is that the Random Number Generator (RNG) itself must be part of the game state. It should be initialized once with a stable seed and then its state should be advanced with each use. Re-creating an RNG on-the-fly using volatile data like position is a recipe for desync.

    PurrNet provides PredictedRandom for this exact purpose.

    ✅ Step 1: Add the RNG to the State Struct

    First, we add the PredictedRandom instance directly into the data structure that gets synchronized and reconciled by PurrNet. In our case, this is the AI’s state machine data.

    using PurrNet.Prediction;
    
    // ...
    
    public struct FiniteStateMachineData : IPredictedData<FiniteStateMachineData>
    {
        public int health;
        
        // ... other state variables ...
    
        // WHY: The RNG's state is now part of the data that PurrNet
        // will roll back and reconcile, ensuring its sequence of numbers
        // is always in sync between the client and the server.
        public PredictedRandom random;
    
        public void Dispose() { }
        
        // ... Equals() and GetHashCode() are updated to include 'random' ...
    }
    C#

    ✅ Step 2: Initialize the RNG Once

    First, we add the PredictedRandom instance directly into the data structure that gets synchronized and reconciled by PurrNet. In our case, this is the AI’s state machine data.

    protected override AIState GetInitialState()
    {
        // 1. Get the deterministic, networked ID from PurrNet.
        // This value is the same for this AI on all machines.
        uint deterministicSeed = (uint)id.objectId.instanceId.value;
    
        // 2. Ensure the seed is not 0 (a requirement for Unity.Mathematics.Random).
        if (deterministicSeed == 0)
        {
            deterministicSeed = 1;
        }
    
        // 3. Create the RNG and store it in the initial state.
        // This is the ONLY time we will call Create().
        return new AIState
        {
            FSM = new FiniteStateMachineData
            {
                random = PredictedRandom.Create(deterministicSeed)
            }
        };
    }
    C#

    ✅ Step 3: Use and Advance the Stored RNG

    Now, whenever any part of the AI’s logic needs a random number (like choosing a new patrol direction), it accesses the single, shared instance from the current state. Each call to NextFloat() not only returns a deterministic value but also advances the RNG’s internal state, ensuring the next random number will also be correct in the sequence.

    private Vector2 GetNewDeterministicDirection()
    {
        // 1. Get a reference to the single, stateful RNG instance.
        // We are not creating anything new here.
        ref var random = ref aiController.Module.FSM.currentState.random;
    
        // 2. Use it to get the next random value in its sequence.
        float angle = random.NextFloat(0f, 360f) * Mathf.Deg2Rad;
        return new Vector2(math.cos(angle), math.sin(angle));
    }
    C#

    This three-step pattern ensures that our AI’s “random” decisions are perfectly repeatable and synchronized across the network, completely eliminating this category of desync bugs.


    2. The Time Problem

    Time seems simple, but in game engines, it’s tied to how fast your computer can render frames.

    ❌ The Wrong Way: Time.deltaTime

    Time.deltaTime is the time elapsed since the last frame. If you are running at 144 FPS, Time.deltaTime will be small (0.0069s). If your friend is running at 60 FPS, their Time.deltaTime will be larger (0.0166s).

    If you calculate movement using this, the player running at 144 FPS will move a shorter distance per frame, but more frequently, while the 60 FPS player will move a larger distance less frequently. Over many frames, rounding errors in floating-point math will accumulate, causing a desync.

    // ❌ NON-DETERMINISTIC: Player movement will differ based on FPS.
    void Simulate(ref PlayerState state, float delta)
    {
        // This is a desync waiting to happen!
        state.position += state.velocity * Time.deltaTime; 
    }
    
    C#

    ✅ The Right Way: The Fixed delta

    PurrNet operates on a fixed tick rate (e.g., 30 ticks per second). This means the simulation always advances in fixed time steps, completely independent of the framerate. In my project, this is 1/30 = 0.0333... seconds per tick.

    PurrNet provides this fixed time step as the delta parameter in its Simulate methods. You must always use this delta.

    ✅ A Good Example from Our Project:

    PlayerMovementModule.cs correctly uses the delta provided by PurrNet to calculate the new velocity, ensuring the physics calculations are identical regardless of framerate.

    private void ApplyMovementPhysics(Vector2 inputVector, float speedMultiplier, float lerpSpeed, float delta)
    {
        var currentVelocity = playerController.PredictedRb.linearVelocity;
        var newVelocity = MovementUtility.CalculateMovementVelocity(
            currentVelocity,
            inputVector,
            data.maxSpeed,
            speedMultiplier,
            lerpSpeed,
            delta // ✅ USING THE DETERMINISTIC, FIXED DELTA
        );
    
        playerController.PredictedRb.linearVelocity = newVelocity;
    }
    
    C#

    3. The Collection Order Problem

    When you ask Unity for a list of objects, like FindObjectsByType, there is no guarantee about the order in which you’ll get them. If the server gets [PlayerA, PlayerB] and a client gets [PlayerB, PlayerA], and your code processes them in that order, the simulation will diverge.

    ❌ The Wrong Way: Unordered Collections

    // ❌ NON-DETERMINISTIC: The order of this array can be different for everyone.
    var scenePlayers = FindObjectsByType<PlayerController>(FindObjectsSortMode.None);
    foreach (var player in scenePlayers)
    {
        // Processing players in a random order will lead to desyncs if they interact.
    }
    
    C#

    ✅ The Right Way: Stable Sorting

    You must always enforce a stable, deterministic sort order on any collection you iterate over. The best way is to sort by a value that is unique and consistent for each object, like a NetworkID.

    ✅ A Critical Fix from my Project:

    PlayerManager.cs correctly finds all PlayerController objects and then immediately sorts them by their id‘s hash code before processing them. This ensures the list of players is in the same order on the server and all clients.

    // Player.PlayerManager.cs
    
    private void DiscoverScenePlayers(ref PlayerManagerState state)
    {
        // 1. Get the players in whatever order Unity provides.
        var scenePlayers = FindObjectsByType<PlayerController>(FindObjectsSortMode.None)
            // 2. ✅ CRITICAL: Immediately sort them into a predictable order.
            .OrderBy(p => p.id.GetHashCode()) 
            .ToArray();
    
        state.activePlayerIds.Clear();
    
        // 3. Now, process them in a guaranteed-deterministic order.
        foreach (var player in scenePlayers) 
        {
            state.activePlayerIds.Add(player.id);
        }
    }
    
    C#

    Next Up: Part 3 – Reconciliation & State Management

    Now that we understand how to keep our simulation deterministic, we’ll explore what happens when it breaks, and how the magic of reconciliation fixes it.

  • Part 3: PredictedIdentity in Practice – The Core Methods

    Part 3: PredictedIdentity in Practice – The Core Methods

    Now that we understand the high-level workflow, let’s get practical. When you create a script that inherits from PredictedIdentity, you’ll be working with a handful of key override methods. Understanding what each one does—and more importantly, what it shouldn’t do—is the key to writing clean and effective networking code.


    The Input Lifecycle: UpdateInput & GetFinalInput

    As we covered in Part 2, handling input correctly is vital. PurrNet splits this into two phases:

    • protected override void UpdateInput(ref INPUT input)
      • When it runs: Every single visual frame (Update).
      • What it’s for: Accumulating single-action inputs (like Dash or Jump) that might happen between simulation ticks. Use |= to make sure you don’t miss a button press.
    • protected override void GetFinalInput(ref INPUT input)
      • When it runs: Just before the simulation tick (Simulate()).
      • What it’s for: Setting continuous inputs (like movement axes) to their final value for this tick. This is also when your accumulated single-action inputs are “consumed” by the simulation.
    // Player._Module.Input.PlayerInputModule.cs
    
    // Runs every frame to catch clicks
    protected override void UpdateInput(ref PlayerInputData input)
    {
        input.dashInput |= _playerLocalInput.IsDashInputPressed();
    }
    
    // Runs once per tick to set the final state
    protected override void GetFinalInput(ref PlayerInputData input)
    {
        input.horizontalInput = _playerLocalInput.MovementInputQueued.x;
    }
    
    C#

    The Core Loop: Simulate() vs. UpdateView()

    This is the most important architectural separation in the entire system.

    protected override void Simulate(ref STATE state, float delta)

    • What it’s for: GAMEPLAY LOGIC ONLY ⚠️
    • When it runs: Once per simulation tick (30 times per second for us). It also runs at high speed during a rollback/replay.
    • Key Parameter: It gives you ref STATE state, which is a direct reference to the currentState. This is the live, predicted state that you will modify.
    • 🚨 The Rule: The code in here must be deterministic. It should only modify the state based on inputs and timers. NEVER put visual effects, sound, or animations in here (with some specific exceptions, which we’ll cover).
    protected override void Simulate(ref PlayerMovementStateData state, float delta)
    {
        // Good: Reading input, calculating physics, changing state variables.
        var inputVector = ProcessMovementInput();
        var newVelocity = MovementUtility.CalculateMovementVelocity(..., delta);
        playerController.PredictedRb.linearVelocity = newVelocity;
    
        // BAD: Do NOT do this here!
        // Instantiate(myParticleEffect);
        // myAudioSource.PlayOneShot(sound);
    }
    
    C#

    protected override void UpdateView(STATE interpolatedState, STATE? verified)

    • What it’s for: VISUALS AND EFFECTS ONLY. ⚠️
    • When it runs: Every single visual frame (Update or LateUpdate). It never runs during a rollback/replay.
    • Key Parameters:
      • STATE interpolatedState: A smoothed-out, “in-between” version of your state. Use this for things like UI or effects, to ensure it moves smoothly instead of stuttering from tick to tick.
      • STATE? verified: The last known state that the server has confirmed as being 100% correct. verified.HasValue will be true once the server has sent at least one update. You can use this to decide if you should play a critical animation.
    • 🚨 The Rule: This is the safe place for all non-deterministic code: animations, particle effects, UI updates, sound effects.
    protected override void UpdateView(PlayerStateData interpolatedState, PlayerStateData? verified)
    {
        // Good: Playing animations that are safe to predict for our own character.
        if (AnimationSystemUtility.ShouldUpdateAnimationsInView(predictionManager, this))
        {
            playerController.AnimationSystem?.UpdateAnimations(
                playerController.PredictedSm.currentStateNode,
                verified.HasValue // We can pass this down to the animation system
            );
        }
    }
    
    C#

    Handling Other Players: ModifyExtrapolatedInput

    When you don’t have fresh input data for a non-owned object (e.g., due to packet loss), the system will “extrapolate” by re-using the last known input. This can cause a remote player to keep walking forward and then snap back when the correct data arrives.

    • protected override void ModifyExtrapolatedInput(ref INPUT input)
      • When it runs: During the simulation of a non-owned object when the system is missing new input and has to guess.
      • What it’s for: To gracefully degrade the extrapolated input. For example, you can reduce the movement input so the remote character smoothly slows to a stop instead of walking forever. This makes minor packet loss much less noticeable.
    // Player._Module.Input.PlayerInputModule.cs
    
    // This makes remote players feel much smoother during minor network issues.
    protected override void ModifyExtrapolatedInput(ref PlayerInputData input)
    {
        // Gradually reduce movement input to zero.
        input.horizontalInput *= 0.6f;
        input.verticalInput *= 0.6f;
    
        // Snap to zero when it's very small to ensure a complete stop.
        if (Mathf.Abs(input.horizontalInput) < 0.2f) input.horizontalInput = 0f;
        if (Mathf.Abs(input.verticalInput) < 0.2f) input.verticalInput = 0f;
    }
    
    C#

    We will cover extrapolation and interpolation in more detail in a future guide. For now, just know that this method is a powerful tool for improving the visual quality of remote entities.


    Next Up: Part 4 – The Core Principles of Determinism

    Now that we are familiar with the main methods, let’s dive into the strict rules we must follow inside Simulate() to ensure our predictions are accurate.

  • Part 2: The PurrNet Workflow – From Input to Simulation

    Part 2: The PurrNet Workflow – From Input to Simulation

    In Part 1, we covered why we use Client-Side Prediction. Now, let’s look at how PurrNet’s “PurrDiction” system makes it happen. This page will give you the high-level map of the key components and the lifecycle of a single predicted tick, providing the context for the Simulate() methods we’ll discuss later.


    The Core Components: A 2-Part System

    At its heart, the PurrDiction system has two main parts that work together:

    1. PredictionManager: Think of this as the “World” or the “Director”. There is one PredictionManager per scene. Its job is to orchestrate the entire simulation. It manages a list of all predicted objects and is responsible for advancing the simulation tick by tick, handling rollbacks, and triggering reconciliations. You will rarely interact with it directly, but it’s the engine running everything under the hood. [Source: PurrNet Docs – Overview]
    2. PredictedIdentity: These are the “Actors” in our world. Any object that needs to be predicted (players, AI, projectiles) must have a script that inherits from PredictedIdentity. This is the component where we will write all of our gameplay logic. [Source: PurrNet Docs – Predicted Identities]

    Choosing Your “Identity”: The 3 Flavors of Prediction

    PurrNet gives us three base classes to inherit from, depending on what our object needs to do. Choosing the right one is the first step in creating a networked object.

    1. PredictedIdentity<INPUT, STATE> (For Player-Controlled Objects)

    • What it is: An identity that takes player INPUT to modify its STATE.
    • Use Case: Perfect for a player character that directly responds to key presses.
    • Example: While our project uses a modular approach, a simple Player Controller would look like this
    public struct PlayerInput { public Vector2 Move; public bool Jump; }
    public struct PlayerState { public Vector3 Position; public Vector3 Velocity; }
    
    public class SimplePlayer : PredictedIdentity<PlayerInput, PlayerState>
    {
        protected override PlayerInput GetInput() { /* Code to read keyboard/gamepad */ }
        protected override void Simulate(PlayerInput input, ref PlayerState state, float delta) { /* Move player based on input */ }
    }
    C#

    2. PredictedIdentity<STATE> (For State-Driven Objects)

    • What it is: An identity that has a STATE but is not directly controlled by player input. Its state changes based on time, physics, or internal logic.
    • Use Case: Perfect for AI, physics-based projectiles, or moving platforms.
    • A Perfect Example from Our Project:
    // AI._Module.Movement.AIMovementModule.cs
    public class AIMovementModule : PredictedIdentity<AIMovementStateData>
    {
        // This AI's movement isn't driven by player input,
        // but its state (position, velocity) still needs to be predicted and reconciled.
        protected override void Simulate(ref AIMovementStateData state, float delta)
        {
            // ... AI pathfinding logic goes here ...
        }
    }
    C#

    3. StatelessPredictedIdentity (For Logic Handlers)

    • What it is: A special type of identity that has no state of its own to reconcile. It simply hooks into the Simulate() loop to run logic every tick.
    • Use Case: Ideal for manager classes or controllers that coordinate other PredictedIdentity components.
    • A Perfect Example from Our Project:
    // Player.PlayerController.cs
    public class PlayerController : StatelessPredictedIdentity
    {
        // This controller doesn't have its own state. Instead, it reads input
        // and tells its various modules (Movement, Combat, etc.) how to behave.
        // It's the "brain" coordinating the stateful "limbs".
    }
    C#

    The Lifecycle of a Predicted Tick

    While we will dive into the specific override methods in the next section, it’s helpful to understand the high-level lifecycle that happens for every predicted object on every tick:

    1. Gather Input: For player-controlled objects, PurrNet uses a sophisticated system to gather input. It ensures that quick, single-frame actions (like a dash command) aren’t missed between simulation ticks, while continuous actions (like holding a move key) are read at the last possible moment for accuracy. This process is explained in detail in the next part.
    2. Simulate State: The Simulate() method is called. This is where all your deterministic gameplay logic lives—updating position, changing health, modifying state based on the input from step 1.
    3. Save State: The new state produced by the simulation is saved into a history buffer, timestamped with the current tick. This history is essential for the magic of reconciliation.
    4. Reconcile (If Necessary): If a state update arrives from the server that contradicts the client’s saved history, the PredictionManager triggers a rollback. It effectively says, “Wait, my history at tick 105 was wrong.” It then rewinds to the last correct state and rapidly re-runs the simulation for every tick from that point to the present, using the saved inputs to produce a new, corrected history.

    For More Detail…

    This guide covers the core workflow and best practices we use in our project. However, PurrNet is a deep and powerful library. To understand exactly how components like the PredictionManager or the PredictedHierarchy work under the hood, we strongly encourage you to read the official PurrNet documentation in detail.


    Next Up: Part 3: PredictedIdentity in Practice – The Core Methods

    Now that we know the workflow and how to handle input, we’ll dive deep into the rules we must follow inside Simulate() to ensure our predictions match the server’s calculations.o ensure our predictions match the server’s calculations.

  • Part 1: The “What & Why” of Client-Side Prediction

    Part 1: The “What & Why” of Client-Side Prediction

    Welcome to the world of real-time multiplayer networking! This guide will walk you through the core concepts of Client-Side Prediction (CSP) as implemented in PurrNet/PurrDiction, using examples from my own project.

    The #1 Enemy in Online Games: Latency

    Ever pressed a button in a game and felt that annoying delay before your character reacts? That’s latency (or “lag”). It’s the time it takes for your input to travel to the game server and for the server’s response to travel back to you.

    In a simple server-authoritative model, the flow is:

    1. You press the “move forward” button.
    2. The “move forward” command is sent to the server.
    3. The server receives it, moves your character, and calculates its new position.
    4. The server sends the new position back to you and all other players.
    5. Your game receives the new position and finally updates your character on screen.

    With a latency of 100ms, your character won’t move for 0.1 seconds after you press the button. It feels sluggish and unresponsive.

    The Solution: Predict the Future!

    Client-Side Prediction solves this by making a simple but powerful assumption: “The server will probably agree with my action.”

    With CSP, the flow becomes:

    1. You press “move forward”.
    2. Instantly, your local game predicts the outcome and moves your character forward on your screen. It feels immediate and responsive.
    3. Simultaneously, the “move forward” input is sent to the server.
    4. The server runs its own simulation and calculates the “true” outcome.
    5. The server sends the authoritative state back to you. (We’ll cover what happens if the prediction was wrong in the “Reconciliation” section).

    Server Authority: The Unquestionable Source of Truth

    While we predict locally, we must always respect the server. The server is the law. This is the essence of a Server-Authoritative Model.

    This architecture is the key to preventing cheating. A client can’t just tell the server, “My health is now 1,000,000” or “My position is inside the enemy’s vault.” The client can only say, “I pressed the ‘move forward’ key” or “I pressed the ‘fire’ button.”

    The server receives these inputs, runs its own simulation, and determines the true outcome. If a player is trying to move through a wall, the server’s simulation will simply stop them.

    Why This Prevents Cheating

    Because the only thing we “trust” from a client is their inputs. The entire game state (position, health, ammo, etc.) is calculated and validated by the server.

    This leads to our first critical rule…

    Input Sanitization: Don’t Trust Blindly

    Even though we only trust inputs, a malicious client could still try to abuse them. What if a player sends 1,000 “move forward” inputs in a single second? Without protection, their character would fly across the map, effectively speed-hacking.

    This is why Input Sanitization is crucial. We must validate and clamp inputs to reasonable values.

    ✅ A Good Example from my Project:

    In PlayerMovementModule.cs, we ensure the movement input vector can’t be larger than 1. This prevents a player from sending a modified input like (x: 5, y: 5) to move five times faster.

    private Vector2 ProcessMovementInput()
    {
        var inputVector = new Vector2(playerController.CurrentInput.horizontalInput,
            playerController.CurrentInput.verticalInput);
    
        // ✅ CRITICAL: Clamp the magnitude to 1.
        // This ensures the player cannot move faster than intended by sending oversized inputs.
        if (inputVector.magnitude > 1f)
            inputVector = inputVector.normalized;
    
        return inputVector;
    }
    C#

    This simple check, performed on both the client (for immediate feedback) and the server (for security), is a fundamental part of a secure CSP architecture.


    Next Up: Part 2 – The PurrNet Workflow – From Input to Simulation

    In the next section, we’ll explore the general PurrNet workflow with client-side prediction.